Showing posts with label recipes. Show all posts

Saturday, January 14, 2012

The quickest, easiest, flawless, very versitable DOUGH~


This dough recipe is great.  I have issues with roll dough and rising but this recipe, if I can swing it in every single attempt- it's a keeper.
Try it out sometime, it's one that can be used for anything and everything, as shown from cresants (a prebaked pic) to pizza and everything inbetween cinnamon rolls, basic rolls, scones, disney characters...you name it.

1 Cup Milk
1 Cube Butter
1/2 Cup Sugar 
1 1/2 tsp salt
1/2 cup warm water
1 pkg yeast (2 1/4 tsp)
1/2 tsp. sugar (to sprinkle on top of yeast and warm water)
2 beaten eggs
5 cups flour
Scald your milk by bringing it to a boil in microwave (approx. 2 minutes, I use a glass measuring cup which works well) you can also do this over the stove if desired, then pour milk over your butter, sugar and salt.  Stir and let cool slightly.  In a small separate bowl combine the warm water, yeast and 1/2 tsp. sugar.  Let the yeast activate and then add it and the beaten egg to the milk mixture and stir.  Mix in approx. 5 cups of flour, enough to bring the dough to a nice kneading consistency.  Knead dough and let it rise for about 30 min. or so depending on temp of your home.  Make dough into any option your heart desires. Rolls will then need to raise again for another 30 min or so, but the pizza dough is good to top and cook, no additional raising needed and an easy fix for those kitchen helpers.  Cook at 350 degrees until bottoms are light golden brown. 

Christmas Goodies

December 2011
Chocolate Skor Bar Trifle
So easy but oh so good!  Layer cut up devils food chocolate cake mix into squares, layer with that, chocolate pudding, skor or heath (candy bar) pieces- I buy the ones in the package already cut up into tiny pieces then real whipping cream, repeat layers and ENJOY!  It's even better the second day after sitting in the fridge for awhile giving the layers a chance to soak into each other.
If you haven't ever made this...do, you will be a crowd pleaser!
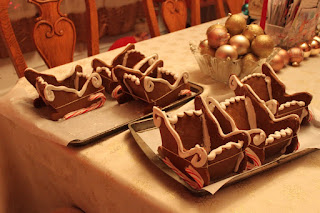
Snow Capped- Gingerbread Sleighs filled with Hot Cocoa and Seasonal Marshmallows and Candy Canes for stirring.
(Those ginberbread shaped and flavored marshmallows are the best, then french vanilla snowmen and red and green stars and trees, found at the grocery store.)  
These were so fun to make, a first for this year but certainly they'll be added to the yearly traditions!
Super Easy and great for giving away- we decided to fill our sleighs with non-perishable items so they could sit on the counter for a few weeks, even as a decoration and still serve a great purpose on those cold winter days or nights...you know how some times you end up with ten goodie trays that never get eaten?  Well this goodie tray will solve that problem.
Decorated Sugar Cookies
Traditional sugar cookies, only this is the best recipe soft, thick and moist!
6 1/2 cups flour, 1 cup sour cream, 2 tsp. baking soda, 1 tsp salt, 1 cup butter or marg., 2 cups sugar, 2 eggs unbeaten, 3 tsp vanilla. 350 degrees for 10 min.
Peppermint Rice Krispy Treats dipped in Milk Chocolate then dusted with Candy Cane
 I knew this ginormous bag of peppermint marshmellows would serve a good purpose!  They looked so pretty too.
 Christmas Crack
Also known as Christmas Crunch if our name for it is found offensive, super easy as "our motto."  Pretzels, Red and Green M and M's, peanuts, Rice Chex, Corn Chex and Cheerios mixed up with white chocolate bark.  I use a big kitchen plastic bag to mix it all up this year and it worked great but feel free to use a large bowl, line counter with parchment paper to pour out to dry it on. An addictive sweet and salty snack for the holidays!
 Santa Cupcakes
These guys are a long time tradition, we use devils food chocolate cupcakes then decorate as shown with vanilla frosting, mini marshmallows, chocolate chips, red hots and red sprinkles.  They aren't just cute but really rather tasty not just for the kids but for adults as well.
Milk Chocolate or White Chocolate Dipped then Sprinkled Oreos
(great to dip in hot cocoa, mmmmm) and then Happy Bars
Happy bars are just the crushed graham cracker crumbs mixed with butter and a tad bit of sugar for the crust, pour a can of sweetened condensed milk over that, sprinkle a cup of chocolate chips over than and then cover the top with coconut and cook em up- always a hit!

Oh My, looks like I forgot to take a picture of the Peanut Butter Balls...
But these are the all time favorite, you can not forget these- kind of like reeses peanut butter cups in a ball. 
18 oz peanut butter, 1 (16oz.) bag of powdered sugar, 1 pkg or 1 1/3 cup of graham cracker crumbs,
 3/4 cup (1 1/2 sticks) softened butter- mix then all up nice and good use your hands don't be shy, roll into small balls, place on wax or parchment paper a top a tray and place in refrigerator or freezer for a few to harden them up a bit and dip to coat in melted chocolate chips or chocolate bark, allow chocolate to harden and yummo.  This batch makes a ton, I actually froze half of the peanut butter balls undipped so the kids can dip some to have on Christmas Eve as well. 
Try out some of these, they just may become some of your easy holiday favorites!

Tuesday, November 22, 2011

Thanksgiving Day Place Settings

I saw these made last year and I knew they were right up my alley so I made it a point to plan to make them for Thanksgiving this year, I'm using them for each place setting at turkey dinner.  They aren't too difficult to make, the kids can help and they are the cutest realistic turkey cupcakes I 've seen.
The making process~
 Step 1- Bake up a batch of cupcakes, while you are doing this- put those little ones who love to help in the kitchen to work unwrapping all of the caramels.  My two year old literally unwrapped each and every one of the caramels, she loved it but not as much as me...tedious things like that make me nutty.
 Step 2- Soften the caramels in the microwave for 5-10 seconds (I did four at a time in a bowl for about 9 seconds, you'll know when you've softened too long...just until they are mold able.  Then take one and wrap and mold it around a pretzel stick for each leg.)
 Step 3- Melt some white chocolate chips or candy melts, then dip in the end of each stick to make them look like those chicken leg bones.  Again, I used the microwave to melt my choc. chips, in intervals of 30 seconds, and stirring in between.
 Step 4- for the lettuce/relish around the turkey, tint some frosting green and then melt it in the microwave 1 min or so until thin and coat corn flakes, cool and dry on wax or parchment paper.  However, next time I will use green candy melts, I think they will harden up better and not turn the cornflakes as soft which will help when decorating.

Step 5- Roll out 3-4 soften camels for each body with rolling pin in between wax or parchment paper.  Use a circular cookie cutter to form the body and a smaller cutter to make way for the stuffing area.  Other alternatives are you could use a drinking glass for the larger circle and scissors for the smaller- to just cut it out.  I had the bigger circle cookie cutter but then I used a gingerbread man cookie cutter (the leg of the gingerbread man was just the right size for the smaller hole.)
 Step 6- Stuffing made out of cut up pieces of pound cake.  I used the Sara Lee brand found in the frozen dessert aisle at the grocery store.
Step 7- Lay the circular body forms on a frosted cupcake attaching the smaller circle ends, push edges down with a utensil if needed, there will be frosting around the edges but this is what you want so you can have frosting set to apply the relish/lettuce, then put a dab of water on each side where you will attach each leg.  (They stick quite well with that tiny dab of water.)
Step 8- Apply the stuffing, lettuce/relish and the fruit (I used Sixlets but you can really use any candy.)
Aren't these the cutest things? Check out the Cupcake Books, "Hello Cupcake" and "What's New Cupcake" for more great cupcake ideas.  Happy Thanksgiving and Count Those Many Blessings!

Saturday, September 10, 2011

Put those rotten bananas to use!

After my sister in law had made some banana muffins for a monkey-themed brunch for a baby shower awhile back, I haven't gone back to my loafed banana bread!  These little chocolate chip banana bread muffins are the perfect after school snack or "sweeter" breakfast fix on the go, no slicing the loaf of bread which eliminates some of the mess~ just quick and easy and the kids LOVE them.  The 24 muffins that one batch makes don't last too long around our home.  You can use any banana bread recipe (we love to add chocolate chips for a twist,  the mini ones actually work the best but we had none on hand this afternoon when we made them) just use a medium size melon scooper to fill your sprayed muffin tins and cook them up for a tastey and semi-healthy treat.
In case you don't have a family recipe of your own, here's ours or rather my mom's:

BANANA BREAD (or muffins in our case)
1/2 cup butter (one cube)
1 cup sugar (rounded)
2 eggs
1 tsp. vanilla
3-4 ripe bananas (you can pre-mash if you desire to make easier to mix)
1 tsp. baking powder
1/2 tsp. baking soda
2 1/2 cups flour
1 cup chocolate chips
Mix sugar with softened butter, add eggs, vanilla and bananas.  Mix well.  Add dry ingredients.  Grease/flour pans (I use the baking spray).  Makes 2 medium loaves or 24 muffins.  Bake at 350, I cooked my muffins for 15-16 minutes the sides will be brown with a lighter top until a toothpick inserts clean (besides melted choc chips.) If you are making loaves bake for 30-45 minutes depending on size of loaf pans.  They taste great fresh and warm out of the oven with a glass of milk or even better cover with plastic wrap or fill a ziplock bag and let the moisture do the work, the second day they are fantastic as well!

Monday, May 16, 2011

Popcorn Analogy


     “The Book of Mormon is another testament of Jesus Christ”

Just as a little kernel of corn when popped can grow into the tasty treat of popcorn for us to enjoy, our love for our Savior can grow if we learn of Him and His goodness from reading the Book of Mormon and scriptures. Yummy popcorn is so good that we want to share it with others just as we will want to share the happiness and joy of Jesus Christ we gain from reading the scriptures. 

2 Nephi 19:6 "For unto us a child is born, unto us a son is given; and the government shall be upon his shoulder; and his name shall be called, Wonderful, Counselor, The Mighty God, The Everlasting Father, The Prince of Peace."

Family Home Evening Carmel Corn Recipe:

(Adult supervision required)
1 Cup butter (2 cubes)
1 Cup light Karo syrup
2 Cups Brown Sugar, packed
1 Can Eagle Brand Condensed Milk
Pinch of Salt
1 1/2-2 Cups popcorn (measure un-popped popcorn, before popped)
* I ended up using quite a bit more popcorn as there was plenty of extra camel to go around.

Combine all ingredients except popcorn and cook over medium high heat, stirring constantly (this burns easily, so make sure you stir constantly) until it reaches a soft ball stage don't over-cook. (For a soft ball stage, Pour a half teaspoon caramel into a 1 cup measure with ice water and mold into a ball. When it holds it shape, but is still very soft, it's done). Pour over popped corn. Cool on 2 large parchment-lined cookie sheets (or lined counter top.) Pull apart and store in air-tight bags.

Enjoy!
Popping air-popped pop corn is always best with a helper and a taste tester!  I had been wanting to test out this Carmel corn recipe from a family relative Susanne for awhile and I found the perfect opportunity.  I incorporated it into my sharing time lesson and provided the kids with a little sample in a Dixie plastic cup, then encouraged them to go home and make it with their own families for FHE.  I brought the air popper and did a little demonstration and analogy (found above) with just the plain pop corn for sharing time with the kids, it went over well and kept their attention to the fullest, they were all so intrigued- it was cute.